 4th Grade Frolics!
It's Monday (almost)! And what a busy week it has been! I am actually having to write this on Friday while waiting for my car to be worked on, because I know this weekend is going to be too busy!
Last week was another fun and productive week in terms of making things. This post has three sections:
1. Crayon Art Party with Friends
2. Crafted for the Classroom
3. The BIG classroom Reveal!
1. Crayon Art Party with Friends
I invited some friends over to explore making melted crayon art with me. We all scoped out te many ideas on pinterest (click the link to see my top 8 inspiration ideas) first, and then gathered to make beautiful art! We tried both the hot glue gun and blow dryer methods. They are both equally messy and equally productive! Also, note that if you try this and need peeled crayons, GRAB A RAZOR! Crayons are terribly difficult to peel otherwise.
Melted crayon coated glue gun!
Blow Dryer Method, and our terrific MESS! Woohoo!
Here are our masterpieces:
Danielle, "Tartis in Time Warp"
She is still pondering how to accent the Tartis more. This melt effect was made by laying crayons like rays coming out of the Tartis, and hot gluing them just enough so they wouldn't fly off the canvas when she started melting them with the blow dryer.
Carrie, "I'll Follow the Sun"
This Beatles song inspired artwork had red, yellow, and orange crayons melted from the top down over carefully taped lettering.
This is what Carrie's crayons melted on to. Interestingly, some crayons are stubborn and just would not melt!! Weird, huh?
Leigh, "Mickey Mouse"
Leigh LOVES everything Disney, so it was no surprise that she ended up with this! She just put crayons all over the canvas and blow dryed them where they were laying. She went over the silhouette of Mickey's head with black paint, if I remember correctly. I love the colors!
Carol, "Standing Pug at Twilight"
This is installment 1 of a Pug series, I have decided! I made this with a glue gun dripping blues and purples from the top over a big pug sticker, then greens from the bottom. After it cooled and hardened, I pulled off the sticker, hot glued back some extra that chipped off with sticker removal, and it was complete! Next I want to do "Sitting Pug at Dawn" and "Running Pug at Noon".
Terri, "Kara's Crayon Art"
Terri hot glued peeled crayons across the top and blow dryed them. I like the three sections it made! Her crayon art is on spray painted black cardboard.
So, that was the crayon art party! have you considered making some crayon art?
2. Crafted for the Classroom
My one and only project for my classroom, besides setting it up (next section) was these files for materials! I immediately had to have them when Clutter Free Classroom gave away the labels earlier this week. I don't know how much longer she'll be giving away a product a day, but if you don't follow her yet, you need to!
I really didn't want to spend any money buying the file boxes, so these were made with Medium Flat Rate shipping boxes from the Post Office. Learn how to make them into file boxes at Craft Therapy.
I spray painted them black, then covered them with scrapbook paper. I am trying to use this same pack of scrapbook paper all around my classroom, in keeping with my new color scheme. The file organizer will go on my desk, and is not there yet in the classroom pictures below. No more digging through a stack on my desk for materials, hopefully! It is a tad bit uneven, but ih, I LOVE it!
3. The BIG classroom Reveal!
I love it when I get to see the classrooms of other teachers, I hope you'll enjoy seeing my classroom. I did a post last year about my classroom that you may also want to check out, I kept a lot of things the same. I have just been beautifying things this summer!
This is my whole group meeting area, with my new crate seats and revamped bulletin board/ calendar area.
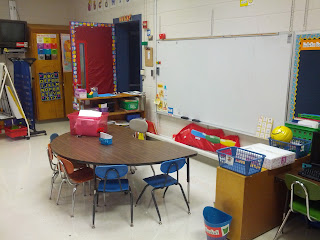
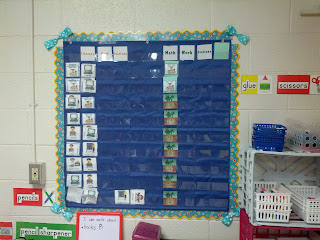
Small group meeting area. In designing this space, I wanted materials easily accessible, minimal distractions (so the students face the board and I face the whole classroom), and I wanted to be by my whiteboard so I could write on it as needed. Above the whiteboard is the sight word word wall. The shelves hold assessment binders, games, and books. The red pocket chart under the board has a folder for each child, sorted into four pockets for my four guided reading groups. On top of the shelves: by the door is the "Write the Room" Center with clipboards and cool glasses to wear, the other shelf with that blue basket - the blue basket is the "Word Work" basket which I put different activities in that can be used for exploring letters and words. There are icons on these that match the icons on the Workstations assignment pocket chart, below. One side is Literacy Workstations, the other side is math. I put the kids pictures with names in the empty areas, and rotate the icon cards to show them where to go. Make sense? Oh, the pocket chart is one of the bigger "Hundreds Charts"
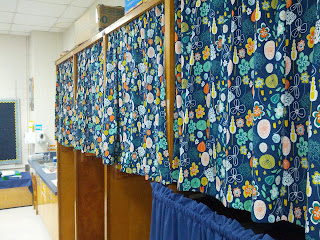
New curtains! Thanks Grandma! These hide a bunch of materials and games. The material is the same material used for the crate seats.
The red seat is my "Safe Spot" where kids can go when they need to reflect on their choices, calm down, or just have some alone time. The cubby shelf next to it holds math manipulatives (picture label on box and shelf spot where the box goes) and on the top two shelves, our math work station tubs (green monster labels). Like Literacy workstaions, the labels match the icons on the assignment pocket chart. Kids can just look at that and know what to get! Oh, I also assign for each pair of kids a "go getter" and a "putter upper" to minimize crowdedness in this area and to stop fighting.
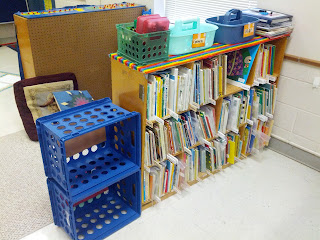
Books! I went a little nuts about organization last year. The shelf above is for teacher access only. Paint sticks section off the categories, with labels on the ends to match the categories. Those same labels are on the books and on labels that slide on to pockets on the book baskets that the kids can use, below. One basket is a book hospital. The baskets on top of the shelf hold dry erase materials and each table's dry erase morning work (name writing, number tracing, etc.). The blue crates are for Bee Books - my version of homework and communication binders. Each table has a crate to put binders in. This is right beside my para-pro's desk.
Library Center. There is a basket of puppets to read stories with/ to.
This is the teacher area. I put my desk and my para's desk facing each other, so during planning it is easy to talk together. It is also convenient for sharing materials and giving each other papers. My desk is in the back, with a cabinet of teacher books and supplies, as well as my filing cabinets. The wide gray cabinet has a drawer designated for tissues, since the tissue box goes right beside that cabinet. The desks will have laptops for student use on them.
Front Bulletin Board!
Starting on the far left...
The circle, triangle, circle thing is a wooden stand I put clothespins on for behavior. They start on the top blue happy face. From there they can move to the top of the happy head, or down to a question mark, or the bottom red sad face.
Next to that, where the vertical yellow ribbon is, is where science standards and higher order thinking questions for science will be velcroed. Next to that is anohter board with a green ribbon and a blue ribbon - those are for ELA and Math standards and questions. These match the vocabulary board colors (other side of the ActivBoard)
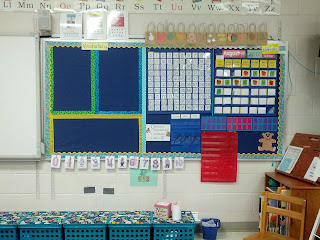
That brings me to my calendar area! I am going to do a mixed approach for now: First we will go over the date and number of days we have been in school, using the calendar, ten frames for the date, place value straws pocket chart for number of days of school, and the hundreds chart. We will count on the hundreds chart, skip counting too. I put up a ribbon and clothespins number line at the bottom, so I can pass out numbers and have the kids come attach them to the number line. I am also going to download Kim Adsit's calendar pack off of TPT, and try to use some of those activities on the ActivBoard. Then, we will do a number talk! I just don't have enough copies to do Calendar Books, boo. :(
Oh, the bags on top are for the months - I put names and pictures on a popsicle stick in the bag of their birth month. That month, their sticks go on the calendar.
The big red pocket chart is where I will put the week's sight words to review. The bear is the Helper Bear - the students decorate a shirt with their name on it, when the bear wears their shirt they are the Helper Bear! I got that idea from Heidi at HeidiSongs.
Thank you to everyone who gave me ideas for this area! I am going to do another quick post just about that (mostly repeating what you see here) where you can comment again for your chance to win a $10 TPT card. You had to already have chipped in an idea on that "Calendar Dilemma" post and then comment again on the calendar decision post to win.
Looking across the room. See how each table has a different color chairs?
View from the entry door. I have four color coded tables for student seating.
In the foreground is my small group table, behind that are two computers. I have a sink on the back wall and a shelf where I put math notebooks and writing materials. Next to that are student coat hooks and storage space.
Whew! This post is massive! Congrats if you made it to the end! Haha! Now tell me, what do you think?? Favorite part?? Suggestions??
Thanks for visiting my blog!
-Mrs. Cobb


